Sheets and title blocks
On this page
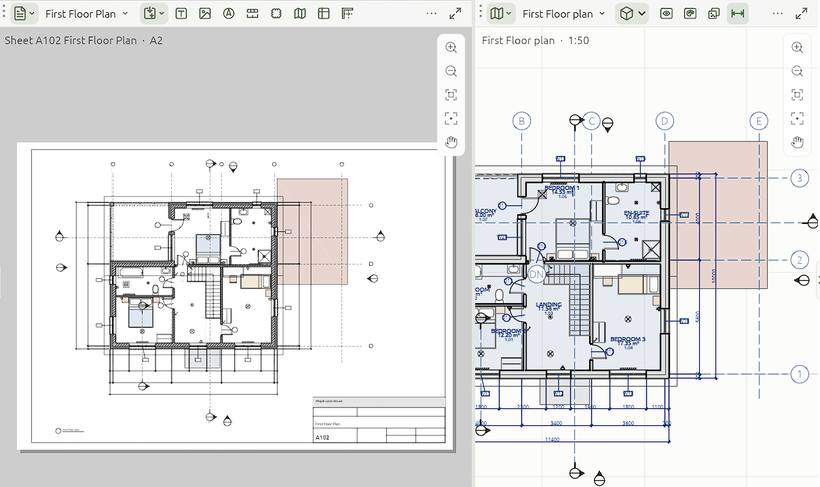
A sheet is a page for printing, from A0 to A4, with a title block. Views placed on it are drawn from the current model, so they are never out of date.
Making a sheet
File › New sheet, or New sheet on the View tab. Open a sheet from the browser's Sheets group, or in any area from its view-type menu. The Sheets and Document workspaces put a sheet beside the drawing you are placing on it. Page Up and Page Down step through the sheets.
The sheet's header
The header of an area showing a sheet holds what belongs to the paper, in groups:
- Place view…;
- Text, North arrow, Scale bar, Revision cloud, Revisions table and Key plan;
- Guides: the rulers and guides (below);
- the PDF of this sheet and Print preview: the sheet as it prints, on white.
Placing views
- Open the sheet.
- Click Place view… and pick a view: plan, section, elevation, 3D view or schedule.
- Drag it where it belongs on the paper.
Each placed view (a viewport) shows its view at the view's scale, with what the view hides left out.
- Scale a viewport: select it and pick a scale in Properties (1:1 to 1:500, or type any other after 1:), or right-click it and choose Scale. The viewport grows or shrinks about its middle. The scale is the view's own, so the view shows at that scale on every sheet it is placed on.
- Crop a viewport: select it and drag its dashed crop frame's edge handles, or set the crop in Properties.
- Line views up: while you drag a view, its centre snaps in line with another view's centre, with a dashed guide.
- Work through it: double-click a viewport to edit the model right there, with every tool; the rest of the sheet greys out. Drag to orbit a 3D view. Esc finishes.
View titles
Under each viewport is its title. In the viewport's Properties: show or hide it, its Number in a circle, the Scale under it, its Words (the view's name, or your own), its Size and Text style. Drag the title on the sheet to place it.
Selecting and moving on the paper
- Drag a box on empty paper to select views, marks and notes: left to right catches what is inside, right to left what it touches; Shift adds.
- Move (M, or G to follow the pointer) moves what is selected on the sheet. It snaps to the paper, the marks, notes, views and guides. Dragging one of several selected items moves them all.
- The zoom column at the area's right zooms, fits and frames the selection.
Rulers and guides
Turn Guides on in the sheet's header: rulers run along the top and left edges.
- Drag a guide out of a ruler; drag it to move it; drag it back onto a ruler to remove it.
- Views (their centre or edges), marks, notes and revision clouds snap to the guides.
- In the sheet's Properties: Copy guides to all sheets, so a set lines up page after page, or Clear guides.
Guides never print. Turned off, they are kept with the sheet.
Text, north arrow and scale bar
What belongs to the paper, not to a view, goes on the sheet itself:
- Text (N): click where it starts, then type. It is a note on the sheet.
- North arrow: turned to the project's true north (Project information). Give it an angle of its own in Properties.
- Scale bar: at the scale of the sheet's views. Set its scale, length, parts and thickness in Properties.
- Picture: a photo, a render, a logo or a stamp. Pick any number of PNG, JPEG and SVG files at once and they are laid side by side. A picture's pixels are kept in the project; an SVG comes in as crisp vector shapes. Its box grips size it (the corners keep its proportions), and Properties has its size, opacity and, for an SVG, one colour.
They are placed clear of the title block. Drag them where they go, or type their X and Y on the sheet, to the millimetre; Delete removes them. Dimensions, tags and notes about the building stay in the views, so they show on every sheet a view is placed on.
Revisions
- Revision cloud: a scalloped outline round what changed, with its revision letter in a triangle (the letter after the project's last). Say what changed and when in Properties. Drag its corner and edge grips to size the box, or make it Freeform: drag its points, drag a + to add one, right-click a point to remove it. Scallops sets how long each arc is; it can have its own colour.
- Revisions table: a row for each revision cloud on the sheet. Drag it where it goes.
Key plan
Key plan places the lowest floor plan again as a small view of its own at 1:500, over the title block, with its dimensions, tags, notes, grids, section marks and furniture hidden. Drag it where it goes; it is a view in the browser, to change like any other.
Title blocks and masters
Fill in the title block in the sheet's Properties. Project-wide fields (project, client, address, status) come from Manage › Project information, and a sheet's own values win over them.
The frame and title block a sheet sits on is its master. Pick it in the sheet's Title block, or click Edit the master to open it in a Masters view, where it is drawn with lines, shapes, text, fields, logos and pictures: what you change shows on every sheet on it. See Masters: title blocks.
File › Sheet templates… is the list of masters: Copy of the built-in block, Import DXF or SVG… for your own drawing, or another project's masters and styles. Any {name} in a master's text becomes a field. {sheet}, {number}, {project}, {scale} and {date} are filled in by each sheet; other fields get a value per sheet in its Properties. Use Use on this sheet, Use on every sheet or New sheet from it.
Printing and exporting
- Ctrl+P, or the PDF button in the sheet's header: the sheet in front, as a PDF named by its number and name.
- Ctrl+Shift+P, or File › Export › Sheets as PDF: the Export sheets window. Choose All, Chosen (the sheets selected in the project browser, or ticked in the list) or This one, and One PDF or A PDF each (into a folder, each named by number and name). Sheets print on white at their own sizes.
- File › This view or sheet as SVG writes the open sheet. See PDF, SVG and DXF.