Edit mode
On this page
Edit mode opens one element so every one of its grips shows, in every view it is in: plans of each level it passes through, sections, elevations and 3D. Use it to reshape what was drawn, not just move it.
Opening and closing it
- Select the element, then switch the area's mode button from Object mode to Edit mode, or press Tab over the view (with several things under the pointer, Tab steps through them instead);
- or double-click the selected element (or one of its corners) in any view;
- or press Enter with it selected.
A layered element's Properties has an Edit its layers in the views button too.
As in Blender, only Tab, the mode button or Finish editing in the right-click menu closes it. Esc drops what is picked and stays in Edit mode, and clicking elsewhere does not leave it either. Properties says Editing while it is open, and the status bar lists what you can do.
Points, edges and faces
In Edit mode the tool bar holds Points, Edges and Faces, for every view at once. They choose what a click picks, as in Blender, and the other kinds of grip step aside. The number keys do the same:
| Key | Picks |
|---|---|
| 1 | Points: corners, ends, vertices |
| 2 | Edges: sides, edges, jambs |
| 3 | Faces: faces, tops, undersides |
Press the same key again to pick everything. With Edges, every edge shows to grab; with Faces, a dot marks each face.
Editing a mass
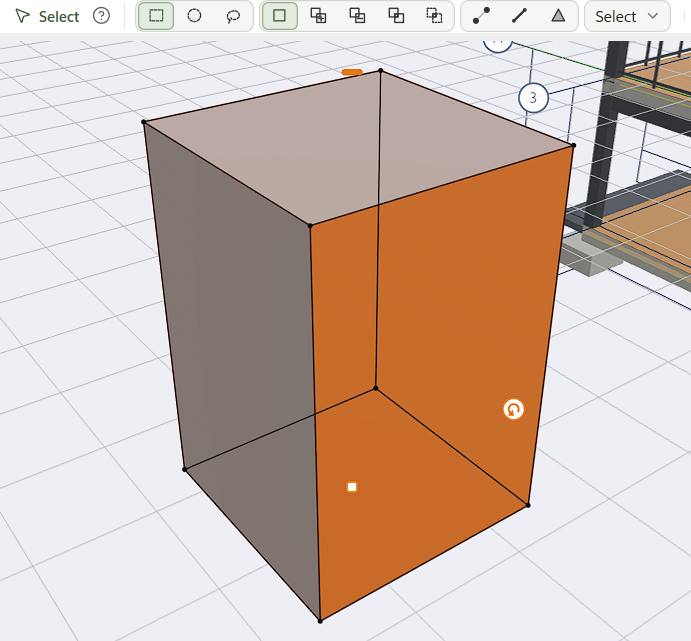
A mass shows only its main grips at rest (its base point, its turn grip and the clicked face's push and pull); every face's arrow, its corners, its edges and the lift arrow come in Edit mode. It is drawn as in Blender, in thin dark wires with small corner dots (their sizes are in Settings › Viewport), and edges and faces light up under the pointer.
- A click picks a point, an edge (anywhere along it) or a face, and it stays lit. Shift picks more, a box picks the points in it, and a click on nothing lets go.
- G or M moves what is picked, R turns it and S scales it about its middle. Type a value or keep to an axis as in Move.
- The Mesh edit section of Properties extrudes, insets and tapers the picked face (see Masses).
Layers: each layer's ends
On a layered wall, press Shift+Tab in Edit mode for Layers: the wall's own grips give way to one grip at each end of each layer, where its join puts that end. They show in plans, sections, callouts and 3D (stepped up the end face there, so each can be reached). Shift+Tab again goes back.
| Do this | And |
|---|---|
| Drag a layer grip along the wall | The layer runs on past its join, or is held back; press Tab to type how far |
| Rest on a grip | It names its layer and end, and how far it was moved |
| Right-click a grip | Reset layer end, Reset all layers; on a wall, Draw by its exterior face or interior face: that line between layers becomes the wall's location line, and the wall stays where it is |
Each layer of a wall also has a bottom and a top grip at mid-length: drag it to run the layer down past the wall's base or up past its top (the outer leaf and insulation down past a slab's edge), or to stop it short (a finish stopping on the screed). Right-click it for Reset layer bottom or Reset layer top.
On a layered slab or roof, Layers puts a grip on each edge of each layer instead: drag it square to the edge to push that layer out past the element's edge or pull it in, such as roof slates run on past the fascia. In plan each layer's grip is drawn a step further out, since they would sit on one another.
Create › Check layer joins lists the walls where a layer moved by hand leaves a gap at a join or runs on into the wall it meets. A moved end's or edge's grip is filled. The edit is kept as an offset from the join, so it stays when the wall moves or stretches. Changing the wall's type keeps the edits of the layers the new type has too, and the status bar says how many were dropped.
Outlines: one way for all of them
Slab outlines and their holes, roof outlines and their holes, shafts, sketches and free railing paths all work the same way. Their outlines are traced in orange, with:
- a square grip on each corner;
- a diamond (◇) in the middle of each edge;
- a round grip just outside each edge of a closed outline.
| Do this | And |
|---|---|
| Drag a corner | It moves, with snaps; press Tab to type how far |
| Drag an edge's round grip | The edge moves square to itself |
| Drag a ◇ | A new corner comes out of the edge |
| Click a corner | It is picked (filled orange); Shift+click picks more |
| Drag a box off the grips | Picks every corner inside it (Shift adds) |
| Delete or Backspace | Removes the picked corners, in one undo step |
| Double-click a corner | Removes it |
| Click inside a hole | Picks the hole: Delete removes it |
| Drag inside a hole | Moves the whole hole |
| Right-click a corner, an edge or a hole | Its menu (below) |
| Esc | Cancels a drag; then drops the picks (Tab leaves Edit mode) |
Delete in Edit mode never deletes the element you are editing: with no corner picked it only says to pick one. A closed outline keeps at least three corners, an open one (a railing's path, an open sketch) two.
Selected but not in Edit mode, an outline shows only its own corners and edges, to drag. Its holes, its diamonds and picking and removing corners need Edit mode, for every element alike.
A sketch with arcs or constraints keeps its corners: you can drag them, but not add or remove them, and the tip by a corner says so.
The right-click menus
- On a corner: Remove corner (or Remove 3 corners when several are picked), Select all corners.
- On an edge: Add corner here (where you clicked), Make arc or Straighten (slab outlines), and on a hole's edge Remove hole.
- Inside a hole: Remove hole, Move hole.
- Anywhere else: Select all corners, Deselect corners, Finish editing.
Shapes are checked as you drag
While you drag, the shape is checked. If it would be broken, it is drawn red with the reason by the pointer and in the status bar, and it is never kept: let go and the last good shape stays. These are refused:
- an outline or a hole that would cross itself;
- a hole outside its slab or roof, or across its edge;
- two holes overlapping.
A corner dropped on the one next to it merges with it, instead of leaving an edge of no length.
Hover, lengths and typing
Rest the pointer on a grip: it grows, and a tip says what dragging, clicking, Delete and right-clicking it do. While you drag a corner, the lengths of the edges either side show by the pointer; an edge or a hole shows how far it has moved.
Press Tab (or just start typing digits) during a drag to type a length: the grip goes that far from where you grabbed it, the way you were dragging. Enter applies it, Esc goes back to the pointer.
Every gesture is one undo step with a clear name, such as Remove 2 corners of Floor slab or Move hole 1 of Floor slab.
Shafts
A shaft's corners and edges and the two round grips in its middle (its base and its top) show whenever it is selected; Edit mode adds its add-corner diamonds and picking. Every slab and roof it cuts follows as you drag. A shaft only cuts a slab or roof that holds it whole: drag it across an edge and the status bar warns that it doesn't cut that slab. See Shafts.
Other elements
Walls, doors, windows, wall openings, columns, beams, stairs and the rest show their usual handles in Edit mode, in every view.