Profiles
On this page
A profile is a cross-section you draw once and use many times: a coping, a cornice, a gutter, a skirting, a steel section. Sweeps carry it along a path, extrusions push it straight up, and columns, beams and railings can take it as their section.
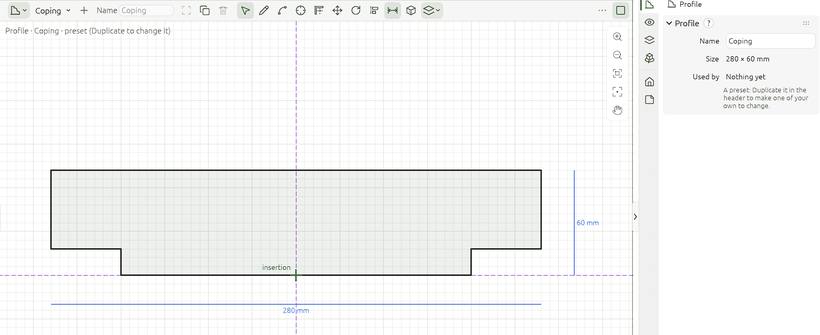
The profile library
Every project has a library of profiles: twelve presets (Coping, Plinth, Bar, Cornice, Skirting, Gutter, Handrail, I-section, Channel, Angle, T-section and Tube) and the project's own. Open it from:
- Manage › Profiles;
- the Profiles group of the project browser;
- the view-type menu of any area: Profiles shows the library and its editor large, as a view of its own.
A preset can't be changed or deleted: Duplicate it to make your own copy, then change that.
The Profile view
A profile is drawn like any drawing, in a Profile view: an area with a grid, guides, snaps, typed lengths and the zoom column, on light or dark paper as your theme. Its header holds:
- the profile list, with a small picture of each: pick a profile to edit;
- + New (a square to start from), From the selection (sketches on any plane, slabs or extrusions, made into one profile), Duplicate and Delete;
- the Name field: type a new name and press Enter. Everything made with the profile keeps it;
- the tools: Select, Draw, Insertion, Guide, Move, Rotate, Align and Pick void;
- Trace: a picture, a DXF drawing or a view of the project under the profile, to draw over;
- Shape: whether the picked shape is closed (a solid) or open (a wire, thickened when swept);
- Mirror: about the insertion point;
- Apply, with a badge counting the elements still made with the old shape.
Over a Profile view, its keys are its own: the app's shortcuts for the model stand aside, while Ctrl+Z and Ctrl+Y still undo and redo. Ctrl + middle-drag zooms, as in the other views.
With a Profile view in front, Properties shows the Profile tab: its name and size, Faces (fill every void), flips, and the picked corner's X and Y to type.
Drawing a shape
- Pick Draw.
- Click the corners. The pointer snaps to corners, guide crossings and trace lines, and level, plumb and 15° guides run from the point you are working from and through every corner.
- For a curved side press A (or the Arc button): click the arc's end, then a point it passes through. L goes back to straight sides.
- Finish: click the first corner to close the shape. A double-click, a click on the last corner again, or Enter finishes it too; it also closes by itself when its ends meet. A right-click cancels it.
A profile can hold several shapes. Where shapes cross or nest, Pick void empties the face you click (a hole), and a click on a void fills it again.
Changing a shape
With Select:
- drag a corner, or an edge (it moves square to itself);
- click an edge's length to type it. The length box opens beside the edge;
- drag a box to pick several (Shift adds); A picks everything; F frames what is picked;
- Delete on a picked edge opens a closed shape there (or trims an open one); on a picked shape, it removes the shape; on corners or guides, it removes them;
- D, or the header's toggle, shows or hides the edge lengths and overall sizes.
Move (M) and Rotate (R) work on what is picked, from a base point or about a centre. Hold Shift at the last click, or press Shift+D first, to drop a copy and keep the original. Align lines an edge or a guide up on another line. A right-click with nothing under way opens a quick menu: Delete, Move, Rotate, Duplicate, Align, Frame, Select all, Pick void and Show or hide dimensions.
The insertion point
The insertion point is where the profile sits on its path: on a wall's top edge for a coping, at the base for a plinth. Pick Insertion and click where it goes; it snaps to corners and guides.
Using a profile
- Sweep and Extrusion: pick the profile in the tool's options before you click. See Extrusions, sweeps and voids.
- Columns and beams: the Column and Beam tools take a library profile beside square and round, and Properties lists them beside an element's own section. See Columns and beams.
- Railings: the top rail can take a profile from the library. See Stairs and railings.
A selected sweep or extrusion has a Profile section in Properties: change its profile, Edit in a view (opens it in a Profile view), Update it to its profile's current shape, or Save as new to make its own shape a new profile of the project.
Apply: when elements change
Editing a profile changes nothing in the model until you click Apply. Then every element made with it takes the new shape, in one undo step. Until then the badge on Apply says how many are still on the old shape, and each of them can also be brought up to date on its own with Update in its Properties.
Deleting a profile leaves what was made with it as it is: those elements keep their shape.
Tip: Draw a profile over a scanned detail: Trace › Add a picture…, then Calibrate: click two points a known distance apart on it and type that distance.