Furniture and fixtures
Furniture and fixtures are objects you place in a building rather than build: basins, WCs, baths, showers, kitchen units, sofas, chairs, tables, beds, wardrobes and desks, and the sockets, switches, lights, radiators and other electrical, plumbing and HVAC fixtures. Every object is an instance of an object type. The type holds the shape (its parts, each in a material), its category, its IFC class, whether it stands against a wall, on its own or hangs from the ceiling, and the height new ones go in at. The object itself only knows where it is, how it is turned and how far above its level it sits.
To try it out, open the starter house, or File › New furnished sample house.
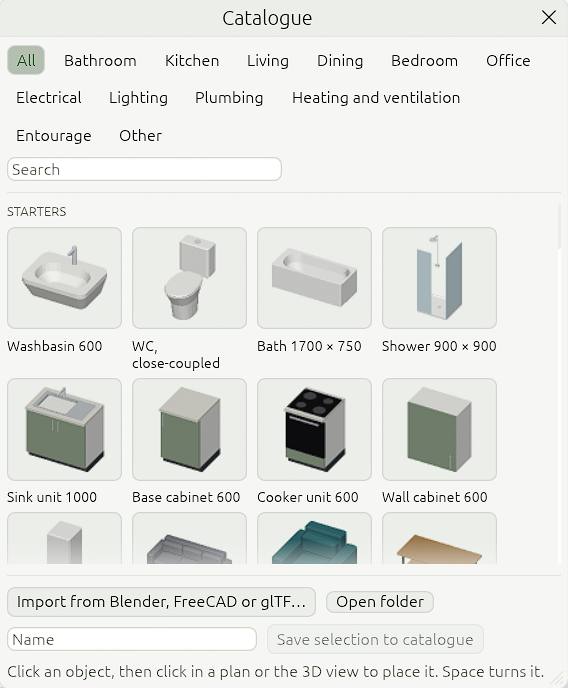
The Catalogue window
Open it with Create › Catalogue…, with the sofa tool on the toolbar, or with + on the browser's Furniture and fixtures group.
- Pick a category along the top (Bathroom, Kitchen, Living, Dining, Bedroom, Office, Electrical, Lighting, Plumbing, Heating and ventilation, Other), or search by name.
- Starters are the objects CreaBIM comes with.
- Yours are the objects you imported or saved. They are kept for every project.
- In this project are the project's own object types, including any read from an IFC file.
- Click a picture to place that object. Right-click one of yours to delete it from your catalogue. Objects already placed from it stay.
Placing objects
With an object picked, the Object tool is on. The object follows the pointer in the plan and in 3D, and a click places it.
- Basins, WCs, baths, showers, kitchen units, beds, sofas and desks back onto the nearest wall within 600 mm. They turn so their back is on the wall's face.
- Free-standing objects, such as tables, chairs and armchairs, go where you click. They are turned as the tool options say.
- Lights, diffusers and smoke detectors hang from the ceiling, centred where you click. See Electrical, plumbing and HVAC fixtures.
- Each goes in at its type's height: a wall cabinet at 1450 mm, a socket at 300 mm.
- Space turns the next object a quarter. Turn sets any angle, Turn 90° adds a quarter, and Free of walls places even wall-standing objects where you click.
- With nothing selected, the Next element tab of Properties shows the object to place: its size, how it is fixed (on a wall, on the floor, hung from the ceiling), its Above floor height before placing, and Pick an object… and Turn 90° as buttons.
- A ghost of the object shows where the click will place it, in the plan and in 3D.
- Keep clicking to place more; Esc ends.
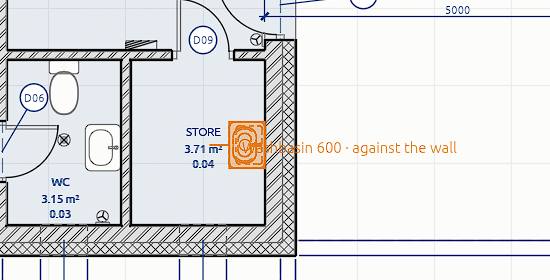
Plans draw each object's plan symbol. A wall cabinet above the cut height is drawn as hidden lines. Sections, elevations and 3D show its full shape in its materials.
Changing an object
Select it. In Properties:
- Above its level raises it, for example a wall cabinet or a wall-hung basin. For something hung from the ceiling it reads Below the ceiling. Rotation turns it, and ↺ 90° adds a quarter. In a plan, the round grip with a curved arrow in front of the object turns it with the pointer, in 5° steps (Alt for any angle).
- The Type picker swaps it for another object type, so a chair can become an armchair. An object always has a type.
- Below them are its type's category, how it is placed (Against a wall, Free-standing or From the ceiling), the height new ones go in at, its IFC class and predefined type, and each part's material. Changing these changes every object of that type.
Move, rotate and duplicate objects like any element. An object keeps its type's shape, so the Move tool's face mode and Align's Stretch move the whole object. Pushing a side face slides it, and pushing its top or bottom raises or lowers it. Aligning a sofa's back to a wall therefore puts it flush.
Object types are listed in the Types window under Objects. Deleting a type deletes its objects too, and Ctrl+Z brings them back.
Your own objects
- From Blender, FreeCAD or glTF: in the Catalogue window, Import from Blender, FreeCAD or glTF… reads a .blend, .FCStd, .gltf or .glb file as one object. Each mesh becomes a part in its own material. The object is set on the floor with the middle of its back edge at the origin, so model it facing −Y (Blender's front view). Its category, IFC class and placement are guessed from the file's and the meshes' names, such as "sink", "toilet", "sofa", "bed" or "desk". An ifc_class custom property in Blender, or an IFC type in FreeCAD, takes precedence. Check the guess in Properties after placing it.
- From the model: select an object, some masses or any elements, type a name and click Save selection to catalogue. An object saves its type; anything else is saved as its 3D shape in its colours.
Your catalogue is a folder of .json files, one per object, in CreaBIM/catalogue in your settings folder (%APPDATA% on Windows, ~/.config elsewhere). Copy them to share objects. A project file carries the types of the objects placed in it, so it opens the same on any computer.
From a terminal, creabim catalogue-import chair.blend <folder> does the same import, and creabim catalogue lists the starters.
IFC
Objects export as IfcFurniture, IfcSanitaryTerminal, IfcElectricAppliance or IfcSystemFurnitureElement (fixtures as IfcOutlet, IfcLightFixture, IfcSpaceHeater and the others listed in fixtures), typed by their IfcFurnitureType, IfcSanitaryTerminalType and so on, with predefined types such as SOFA, BED, WASHHANDBASIN, TOILETPAN, SINK or FRIDGE_FREEZER. Each type carries its shape once, as a Body representation map with each part in its material, and its plan symbol as a FootPrint map. Every object refers to those maps. Opening such a file brings the types and objects back. See IFC.